


ShopSite Version 12 SP2 – Product List Changes
Since the release of ShopSite version 12 SP2 the most surprising update for many customers has been been the new List of Products screen. A variety of new options have been added and prior features have changed a bit but are all still there. In this blog post we’ll highlight those changes.
The New Look
Here’s a screenshot of the new Product List screen, showing a search by product name:
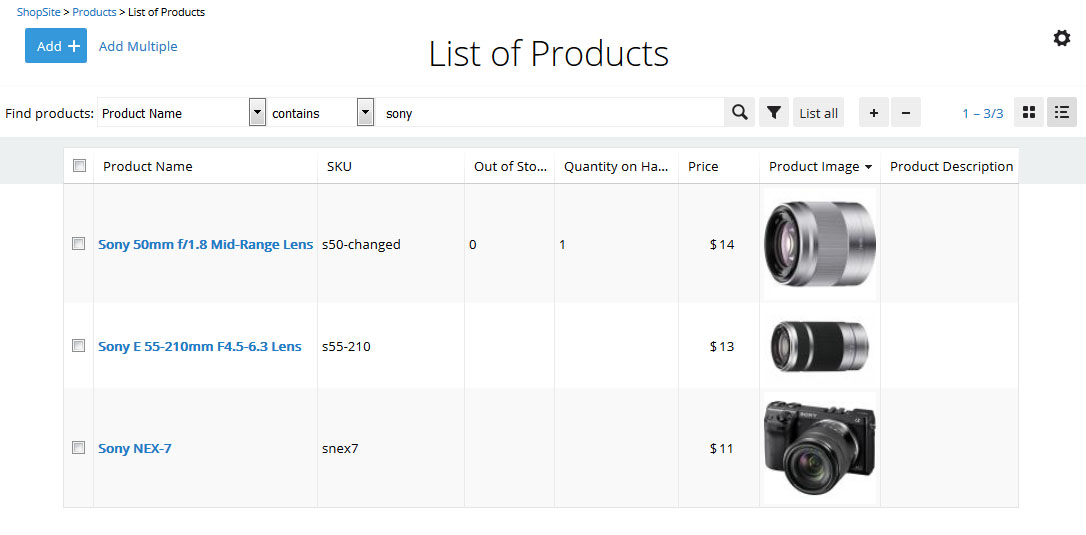
New Product List Screen
Grid View or List View
Toggle Grid or List View
If your product list shows rows of products, with just thumbnail images, name, and price – you’re in Grid View. This is a great way to browse your list but you’re not really taking advantage of the new features available. You can toggle between Grid and List view with the buttons in the top-right corner of the screen that look like the ones to the right.
Basic or Advanced Editing
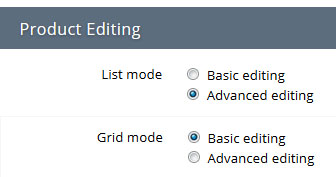
Basic or Advanced Editing
When you click on a product to edit it, do you see all the fields, or just a few basic details? If you only see a few details you’re in Basic Editing mode.
Just like prior versions you can toggle this setting, but it has moved. Click the small gear icon on the top-right of the screen and scroll down to the Product Editing section of the settings. Here you can control which type of editing screen opens for both List view or Grid view.
Filtering Search Results
Refine Search
You can further refine your search results with the funnel icon next to the search icon. Once you search and have a list of products on the screen, enter another search term but click the funnel icon which will search just the existing search results. This allows you to refine your search further as many times as you want.
Add/Remove Columns
Add/Remove Fields
Probably our favorite feature of the new list view is you can now control which fields display in the results. In our sample above you can see we have the Out of Stock and Quantity on Hand values added to ours. You can add or remove which fields you want in the results with the + and – buttons.
Move/Resize Columns
Once you’ve added columns you may want to display them in a certain order or resize them. You can do so easily – just click and hold the mouse button on the column name and you can drag it to a new location. Note: Product Name is always first, you can’t move one to the left of it.
Click and hold on the vertical line between columns to resize the width. You will see the icon change to 2 vertical bars with left and right arrows to show you’re in the right spot.
Selecting Items
Similar to the prior version you can still select single or multiple products at once, but you do it by clicking on the check box next to the name instead of on the name field itself. Want to edit just 1 product – click that one check box. If you want to highlight multiple products you can either click multiple check boxes (just like holding CTRL and clicking on names in the prior version) or you click on the first product check box and scroll down, then hold shift and click on the bottom product’s check box (just like holding Shift and clicking on names in the prior version).
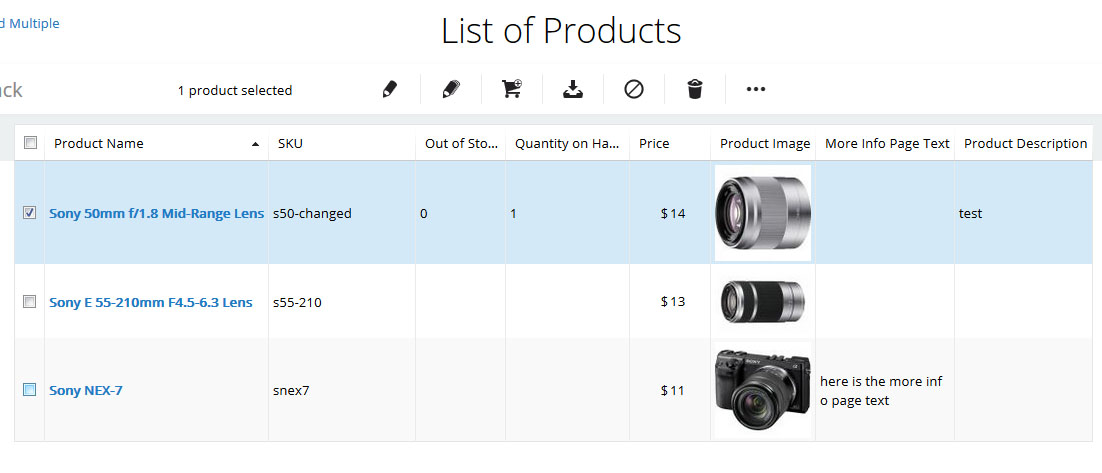
Select Products
TIP: If you want to select all products, just click on the checkbox at the top next to the “Product Name” label and all products on the first screen of the results will be selected. Note the message you will see appear if more than 1 screen of search results is available – it will give you an option to select all results.
Power Edit & Other Options
In the prior version all your options such as Edit Product Info would display on the right side of the screen at all times. Now they will not appear until you have selected at least 1 product. Once you select a product the options will appear, as shown in the screenshot above and in this one:
More Options
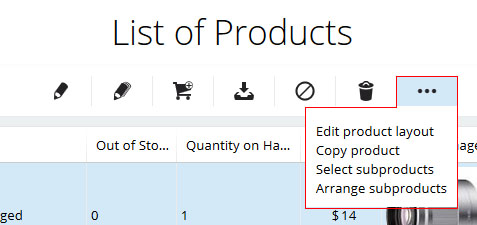
When you’re in the backoffice you can mouse-over the icons to get tool-tip popups showing what they mean. From left to right they are – Edit Product Info, Power Edit, Order Buttons (Order Anywhere), Download Products, Disable Products, and the “…” icon brings up a popup of the less commonly used menu items. The screenshot above shows the options on the popup, such as Edit Product Layout.
…
These changes may come as a shock to most, especially when you’ve been using the prior view for so many years, but all the original functionality is still there with a lot more added in. If you can’t find a feature or you’re unable to do something you did before the upgrade please let us know.
Looking for a web host that understands ecommerce and business hosting?
Check us out today!


