


ShopSite Tip – Add a Contact Us Page
Our customers all need to reach us at some point. Maybe they need to call, send an email, fill out a contact form, or visit in person – and a Contact Us page allows them to get the information they need to reach you.
In this blog post we’ll show how to easily add a Contact Us page to ShopSite with sample code for a contact form and other details.
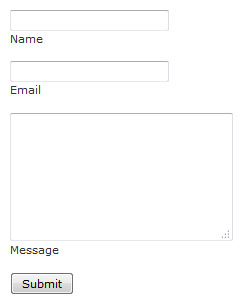
Contact Form
Part 1 – The Contact Form
All LexiConn accounts come with a form processor called formmail.php which is used to parse contact forms and email the results. Below is some sample code you can paste into the Text 1 field of the page you want to use for the Contact Us page in ShopSite.
Notes:
– Be sure you are not in the “editor” mode when you paste this in, it should be pasted as plain text without the editor active.
– Update all the “your-domain.com” lines to the values appropriate for your site.
– Update the “subject” line to what you want the email subject to be.
<div style="float: left; padding-right: 40px">
<!-- Contact Form -->
<form action="http://www.your-domain.com/scripts/formmail.php" method="post">
    <input type="hidden" name="recipients" value="info@your-domain.com" />
    <input type="hidden" name="email" value="info@your-domain.com" />
    <input type="hidden" name="subject" value="Demo Store Contact Form" />
    <input type="hidden" name="good_url" value="http://www.your-domain.com/thankyou.html" />
    <input type="text" required name="realname" /><br />
    <label for="realname">Name</label><br />
    <br />
    <input type="text" required name="replyto" /><br />
    <label for="replyto">Email</label><br />
    <br />
    <textarea required name="comments" cols="25" rows="7"></textarea><br />
    <label for="comments">Message</label><br />
    <br />
    <input type="submit" name="submit" value="Submit" />
</form>
</div>
For more details about formmail.php:
http://support.lexiconn.com/kb/questions/56/formmail.php
http://www.tectite.com/fmdoc/creating_forms.php
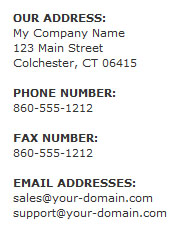
Contact Details
Part 2 – Address & Contact Details
If you have an office or storefront where customers can visit, don’t forget to include the address on your page. You could also include your phone number, fax number, and important email addresses. Here is the code we used for our sample:
<div style="float: left; padding-right: 40px">
<!-- Address & Contact Details -->
<strong>OUR ADDRESS:</strong><br />
My Company Name<br />
123 Main Street<br />
Colchester, CT 06415<br />
<br />
<strong>PHONE NUMBER:</strong><br />
860-555-1212<br />
<br />
<strong>FAX NUMBER:</strong><br />
860-555-1212<br />
<br />
<strong>EMAIL ADDRESSES:</strong><br />
sales@your-domain.com<br />
support@your-domain.com<br />
</div>
<div>
Copy that code and paste it in at the bottom of the Text 1 field, below the code for the contact form.
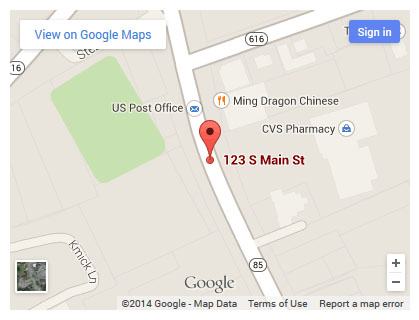
Embed a Google Map
Part 3 – Embed a Google Map
Want to make it easier for people to find you? How about embedding a map from Google Maps on your contact page? To do this, first go to Google Maps and search for your address. Once you have that map ready on your screen view (in another browser tab) the instructions Google has here to get to the embed code:
https://support.google.com/maps/answer/3544418?hl=en
Below is sample code for this part of the page, but replace the “<!– Embed Google Map Here –>” line with the embed code from Google:
<div>
<!-- Embed Google Map Here -->
</div>
Copy that code and paste it at the bottom of the Text 1 field, just like we did for the prior code.
A Sample
Now that you’ve seen the 3 pieces of code from our sample, click here to see what they look like when all put together on a page:
http://shopsite-demo.lexiconn.com/contact-us-sample.html
Note: The contact form is just there to show what it looks like and will not submit anything. When you put it on your store it will send the email and redirect the user to the Thank You page that you configure in the code.
Just a note about the <div> you see we used in our code: The code for the first 2 steps includes some padding and a “float: left” setting. This tells the browser to display the 3 div blocks in a row across the screen and to insert some padding between them. If you change the order of the blocks you may need to adjust the float or padding values to get the layout you are looking for.
W3Schools.com is a great site for learning and testing CSS code:
http://www.w3schools.com/cssref/pr_class_float.asp
http://www.w3schools.com/css/css_padding.asp
…
That’s all there is to it. In just a few minutes of copying & pasting some code you can have a Contact Us page with not only a contact form, but a map showing your customers how to find you.
Looking for a web host that understands ecommerce and business hosting?
Check us out today!


